Category: Uncategorised

  • Basement Demo & Framing

    Basement Demo & Framing

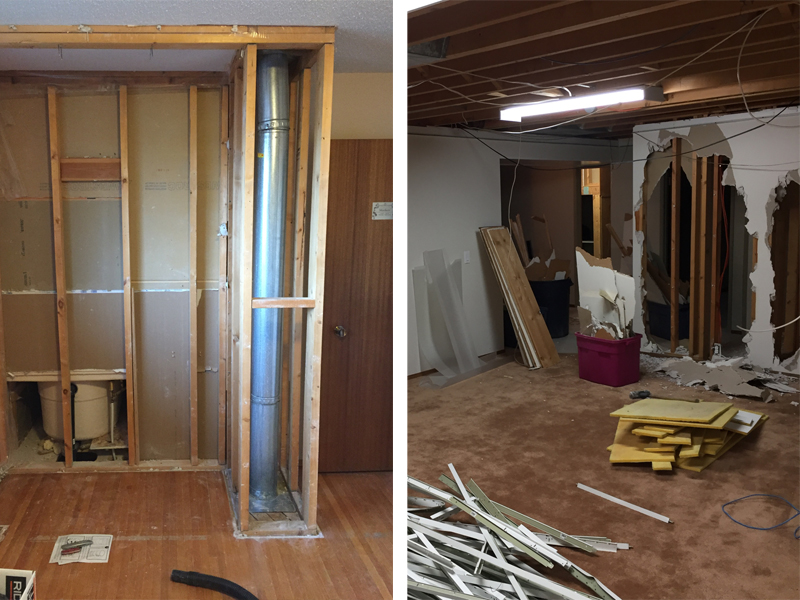
    The basement in 7124 was a mix of 70’s rumpus room and 90’s office. Ugly beige shaggy carpet, red and brown patterned sheet linoleum, lovely dirty white drop ceiling and flickering fluorescent lights. It had a very depressing less than homey feel but lots of space to work with so we got to work right away and started demoing the ceiling and closets days after moving in. To say I was excited to see it transform and turn it into a home for someone was an understatement!
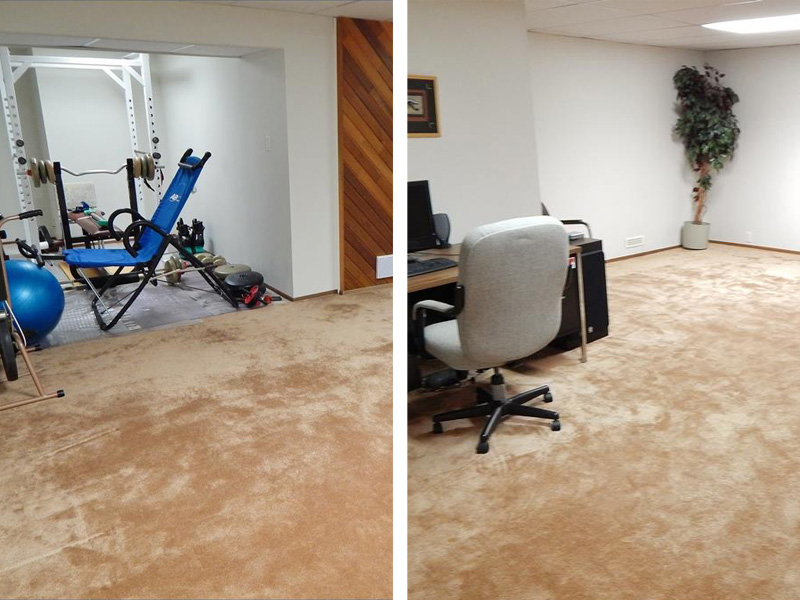
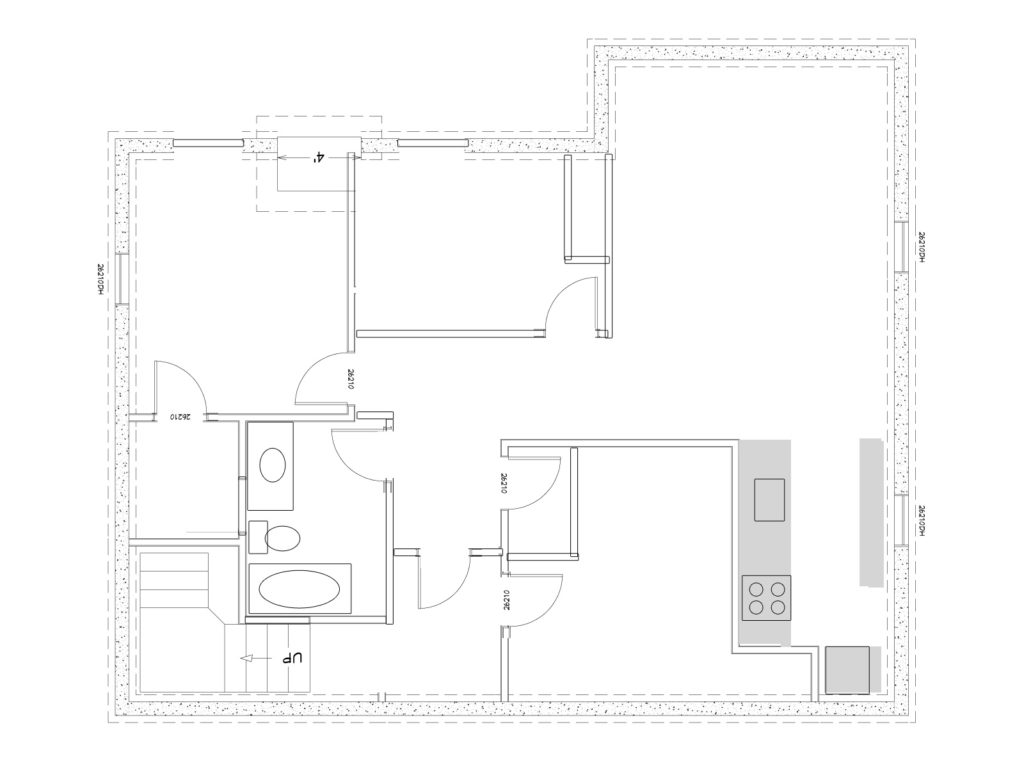
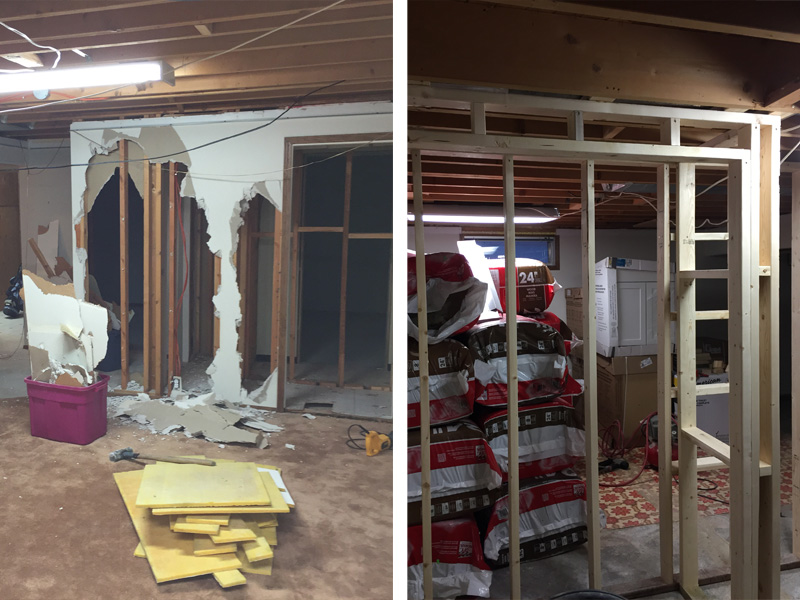
    Demo it turns out is not something I enjoy. It wasn’t so much the breaking things, but the constant cleaning them up that got old. But with the old drop ceiling, drywall and carpet gone we could see a little bit clearer what we had taken on and it started to look daunting. The plan was to keep the one bedroom, build another beside it, move the bathroom beside the staircase to allow both suites access to the utility room and add a galley kitchen into a nook in the back of the basement. These choices were all made to limit the distances we would have to run plumbing but in hindsight it wouldn’t have been much more difficult to move the bathroom 20 feet than it was to move it 5! The things you learn along the way but more on that in another post.
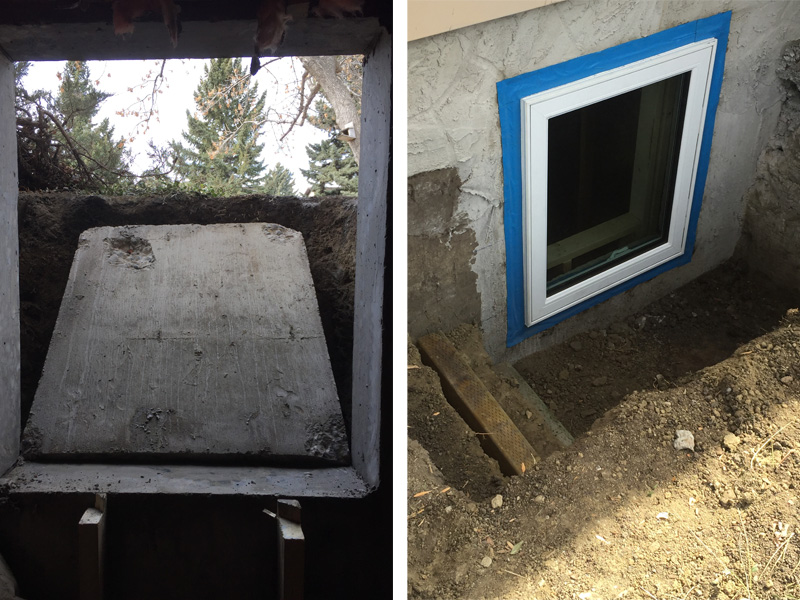
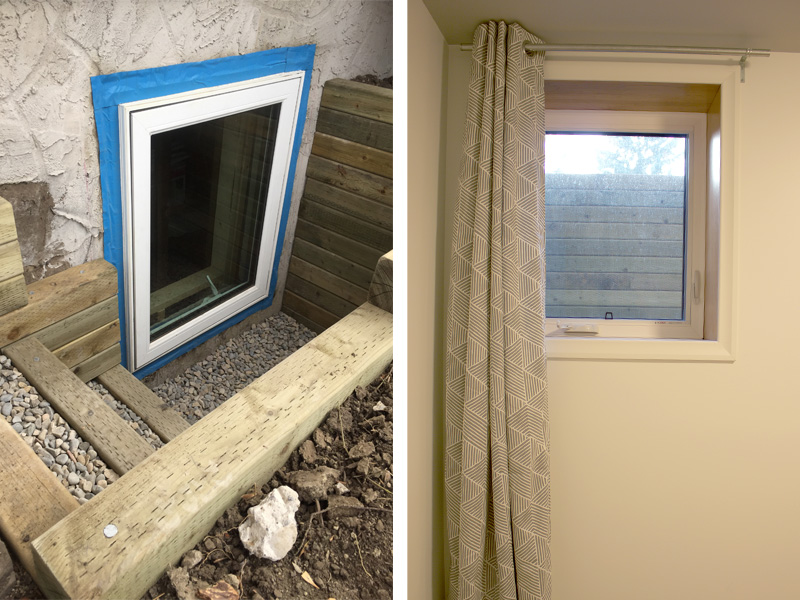
    Even though our basement suite wasn’t going to be “legal” in the eyes of the City (because of zoning issues) it was very important to me to make it safe. We hired a company called Concrete Cutting Geeks to core and dig our window wells for the bedroom egress windows. The windows would help bring in more daylight and provide alternate exit points in the event of an emergency. The Geeks came to do the job on a cold day in February and it was amazing to see how quick they got the wells dug, holes cut and to see the light streaming in. Again my dad and a friend came and helped us install the new windows so we could get it all done before sundown.
    Once we had all the walls up and the electrical inspected we spent what felt like two months shoving the ceiling full of as much safe and sound insulation and residual channel as we could. Previous to this house, we lived in a suited house with very little sound separation. I was very adamant that I wanted sound privacy for both me and the tenant so it was a huge priority. It turns out sound proofing is a very difficult task and we didn’t achieve the level of separation I was hoping for. It’s good, but it’s not have a party and scream good while the neighbour sleeps peacefully next door without hearing a thing. My expectations might have been a tad unrealistic 😛

    With all the bones and guts in place we clad the walls and ceiling in drywall and taught ourselves how to mud and tape. It was a steep learning curve filled with a LOT of Fbombs but we got the hang of it a did a pretty prostar job in my opinion. The drywall was where we really got to see the shape of the suite and how the light moved around throughout the day. I still think the living room & kitchen could use a little more daylight so in the future we will double the size of the two existing windows, but for now we have lots of pot lights!

    Now it was time to move on to the fun part, installing the finishes!

  • 7124 – The Upstairs Bath

    7124 – The Upstairs Bath

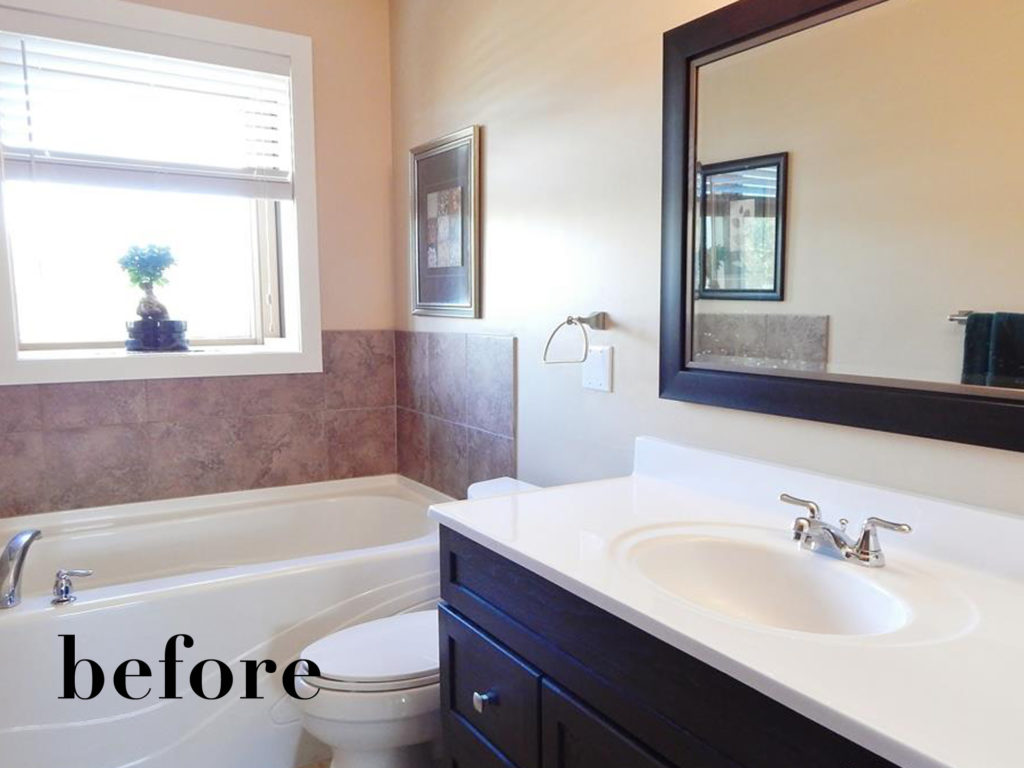
    The bathroom may well be the smallest room in your home but I think it has a tremendous impact on how you feel and approach your day. Home has the power to lift us up and I wanted to have that loving feeling every time I stepped into the commode, even if it was only for a few minutes at a time. Light bright and spa-ish were the plan and we were going to do that while not moving any fixtures and keeping the existing tub and vanity. Really is was a simple resurfacing job with one small caveat, adding a shower where a closet use to be.

    The original room was a standard 60’s bungalow bathroom that had gone through a reno in the 90’s and for some reason had lost it’s shower. The previous owner did install a deep soaking tub instead, which was great I love a good bath. But who has the time to do all their daily washing in the tub, a good shower was needed.

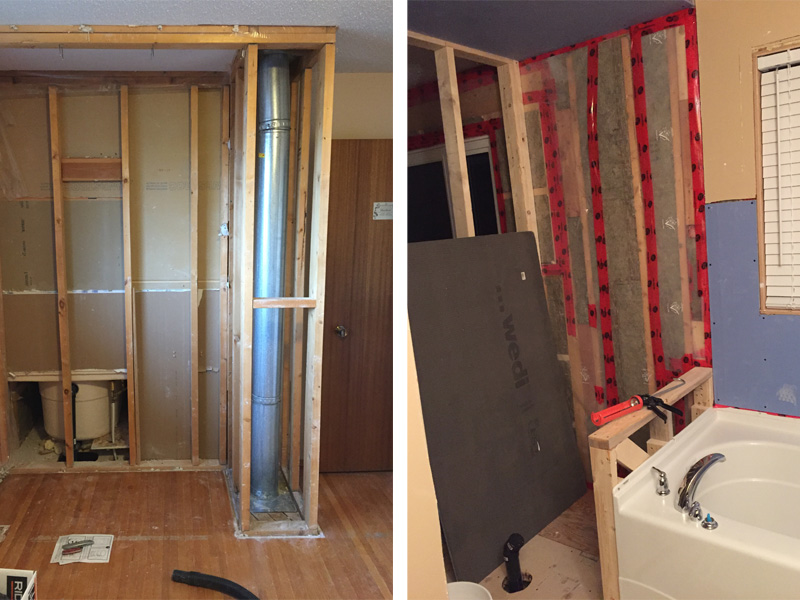
    We were able to steal space for our new walk-in shower from an neighbouring closet and bedroom but it did require installing a new smaller window in that bedroom. So in the middle of January we tore a hole in the side of our new house and with the help of a friend put in a new narrower yet taller triple pane window so we lost as little light as possible. Out of that bedroom we were also able to carve space out to place a stacking washer dryer, a nice little luxury to not have to share with the basement tenant.

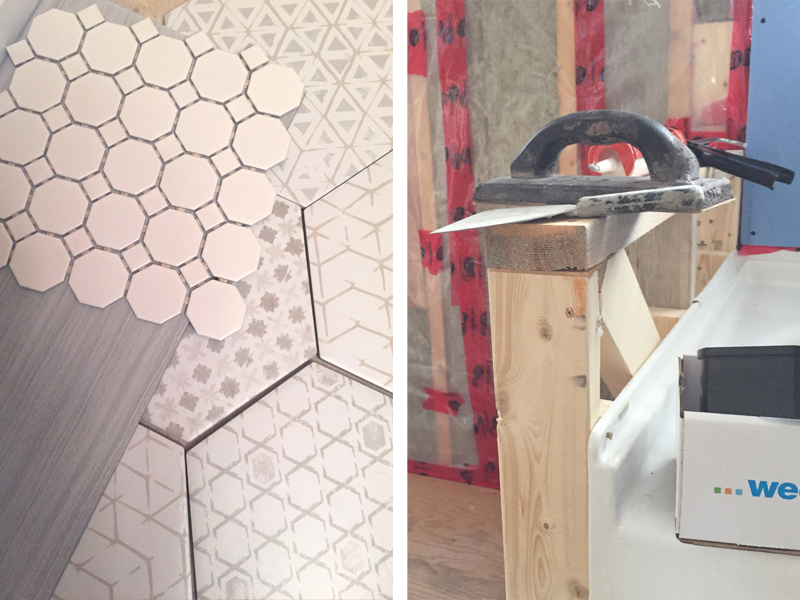
    Since we were both new to plumbing we hired a pro to install the water and waste lines for both the shower and laundry and installed the shower pan and walls ourselves by using Wedi. For those who don’t know Wedi makes a shower kit that was quick easy and watertight, it was best option for our skill level and was well worth the slightly larger cost.

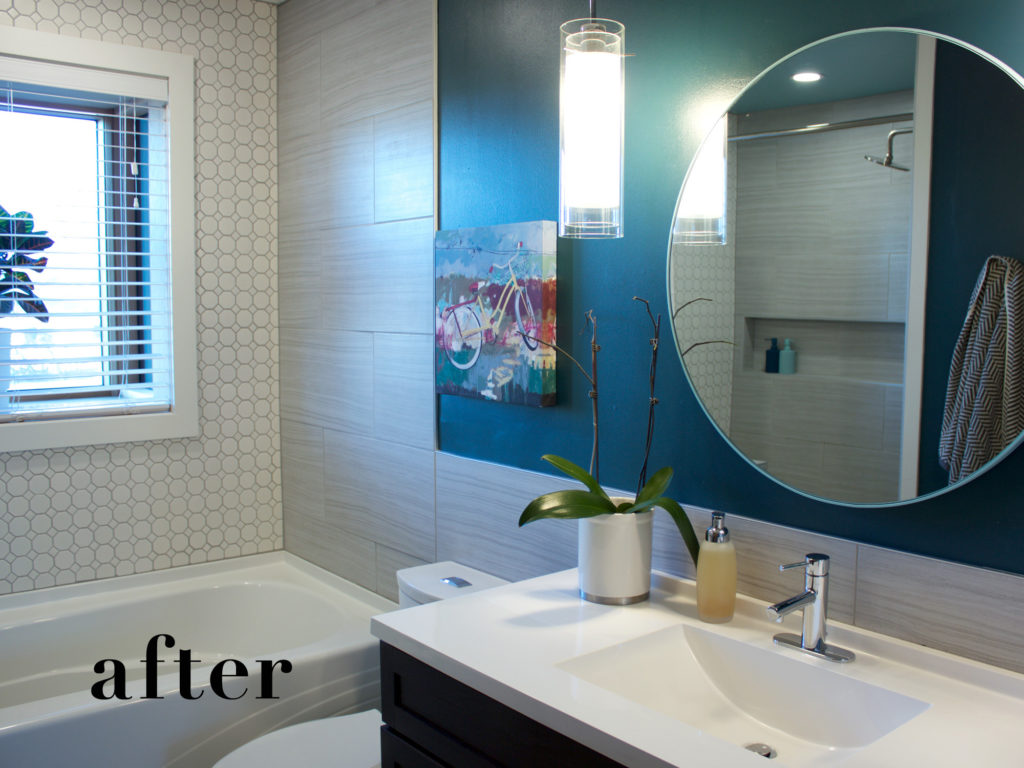
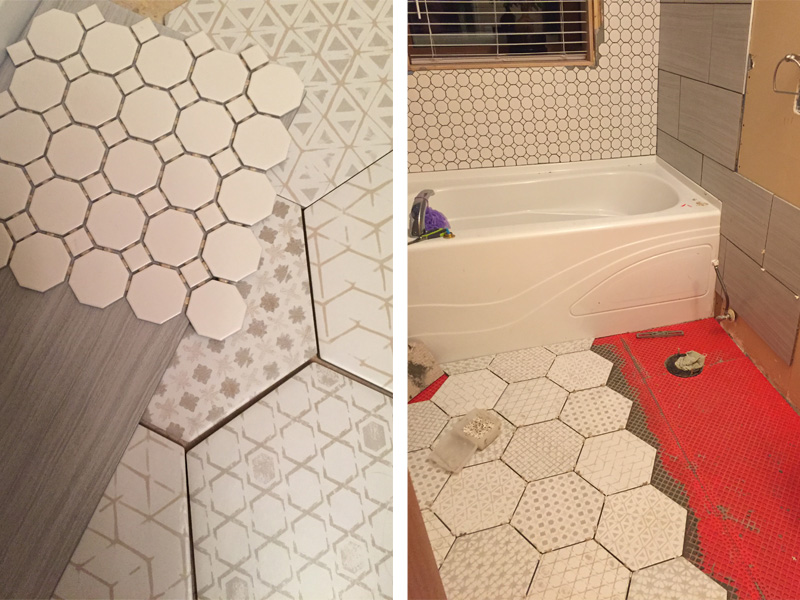
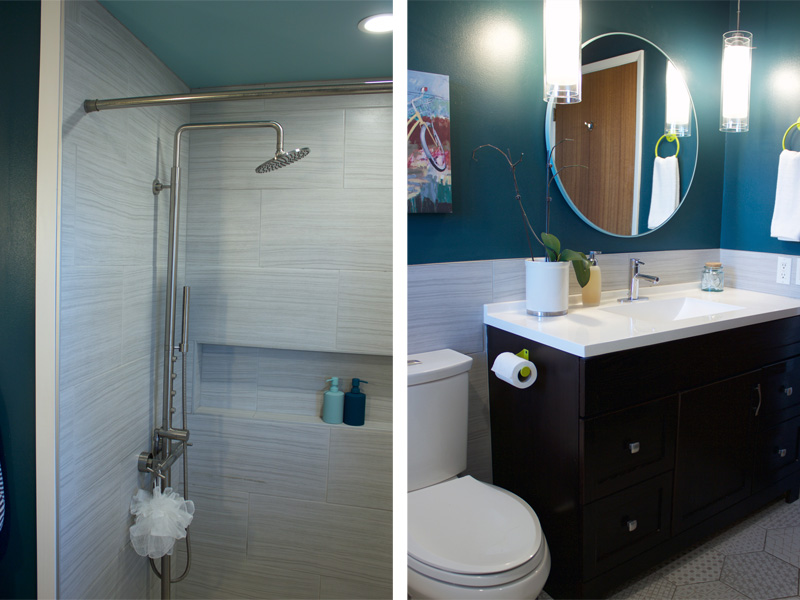
    Picking the tiles and finishes was not exactly the easy part, as I imagined. We were working with the original vanity which had a transitional style and a dark black brown colour but I wanted the tiles to be timeless with mass appeal. I decided on a white grey palette with lots of visual texture, so that meant variation of scale, style and colour. On the back wall of the bathroom and the shower floor we went with a smallish octagon mosaic and used a large 12×24 grey tile with a slight striation on the rest of the shower walls and behind the toilet & vanity. Picking a floor tile to work with these was difficult both visually and financially so we ended up having to spend a little more than I was hoping and picked out a medium format hex with a staggered pattern, almost reminiscent of fabric. I think the hex added that little bit of personality to the bathroom without being super dominant.

    Tiling the bathroom was a feat! We installed tile on at least 50% of the room and decided to do fun little upgrades like a 4 foot long shower niche which proved to be difficult with the less than square grey tile. Thankfully my dad was able to come help, and talk me down before I broke things out of frustration!

    Once we had all the tiles installed the bathroom was lacking drama and decided a dark wall colour would give more contrast and help ground the vanity. I often joke with my boyfriend that Teal is the colour of my soul but it’s not joke I think I bleed Teal! So of course I choose a nice deep rich jewel coloured teal to contrast the light grey and whites.

    All the straight repeated geometric forms of the tiles called for a bit of curvilinear and we opted for a largish circle mirror. We installed pot lights in the shower and above the bath and changed the typical above mirror vanity light to two pendants on either side of the mirror at face height as it’s the most flattering. I choose very simple tube shaped budget conscious pendants as they are the easiest thing to switch out later. We replaced the vanity top with a simple white solid surface from a big box store and upgraded the taps to something simple, geometric and modern in a chrome finish.

    All and all I am really pleased with our transformation of beige box into a small spa with personality. After the upstairs bath was complete it meant we could demo the downstairs bath and start building the skeleton of our basement suite.

  • Renovating 7124

    Renovating 7124

    As we move into the new year the hardest two years of my life are wrapping up. You’ll notice my last blog post was in 2017!!! And then I fell off the map into a renovation hole. I fully admire those that can take on a large renovation and share their progress with the world. I took on a large renovation and feel into the couch every night, too exhausted to think let alone emote. I am not a sharer by nature. If you want to know about me I’d much prefer to be asked. If no one asks I rationlize that no one cares and i don’t share. But not sharing what value I bring to the world has not been a successful business tactic. I am a artist, designer, and maker to the core and can contribute in valuably to the world but I need to let that world know what I do and where to find me. So here it goes, a 10 part series summing up the project that is 7124.

    Part 1 – The Overall Plan

    As I mentioned in my previous post from 2017 😛 our little 60’s bungalow was bought with a specific purpose in mind … creating an income property and secondly forcing as much equity as we possibly could. We toured so many houses and when we saw this one, we looked past it’s flaws and saw the potential. Now that its was ours, it was time to make a plan to deal with those issues and turn it into the diamond I imagined.

    Coming up with the overall plan for the house took many MANY revisions and about 2 months of debate. I wanted the house to feel bright, spacious and welcoming with a little indoor/outdoor living thrown in. And because we were looking to increase value as well, the main floor kitchen and bathroom had to be where we would spend the majority of our budget. Downstairs, in the soon to be basement suite the theme was do as much as possible for as little as possible but don’t scrimp on sound separation! In the end we decided to save costs and move as few main elements as possible.

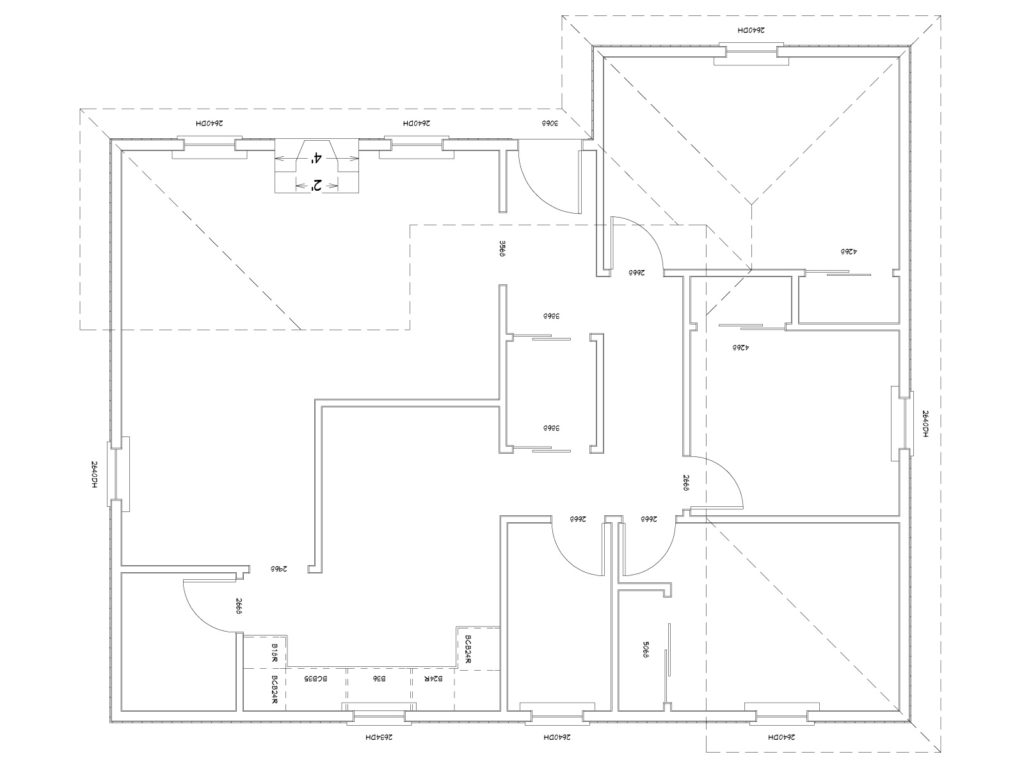
    Main Floor Before

    7124 as it was built had three bedrooms and one bath on the main floor, a small eat in closed off kitchen and an L shaped dining/living room. Our idea upstairs was to

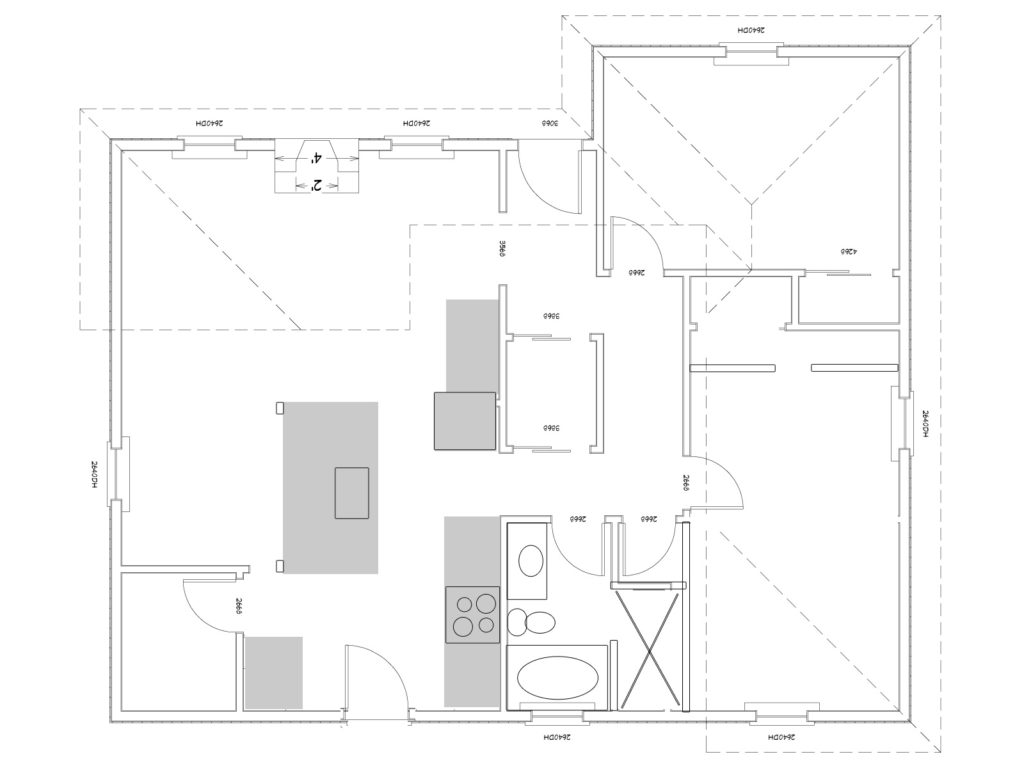
    Main Floor Plan
    • blow out the wall between the kitchen and living room creating a “great room”,
    • adding a exterior doorway in the kitchen connecting it to the backyard,
    • move the master bedroom to the back of the house and enlarge it by combining two smaller rooms, and
    • add a walk-in shower to the bathroom by stealing space from one of the bedrooms closets.
    Basement Before

    The basement had an old 70’s rumpus room feel with one bedroom, a tiny dungeon like bathroom and a large open area. Our plan for it was to;

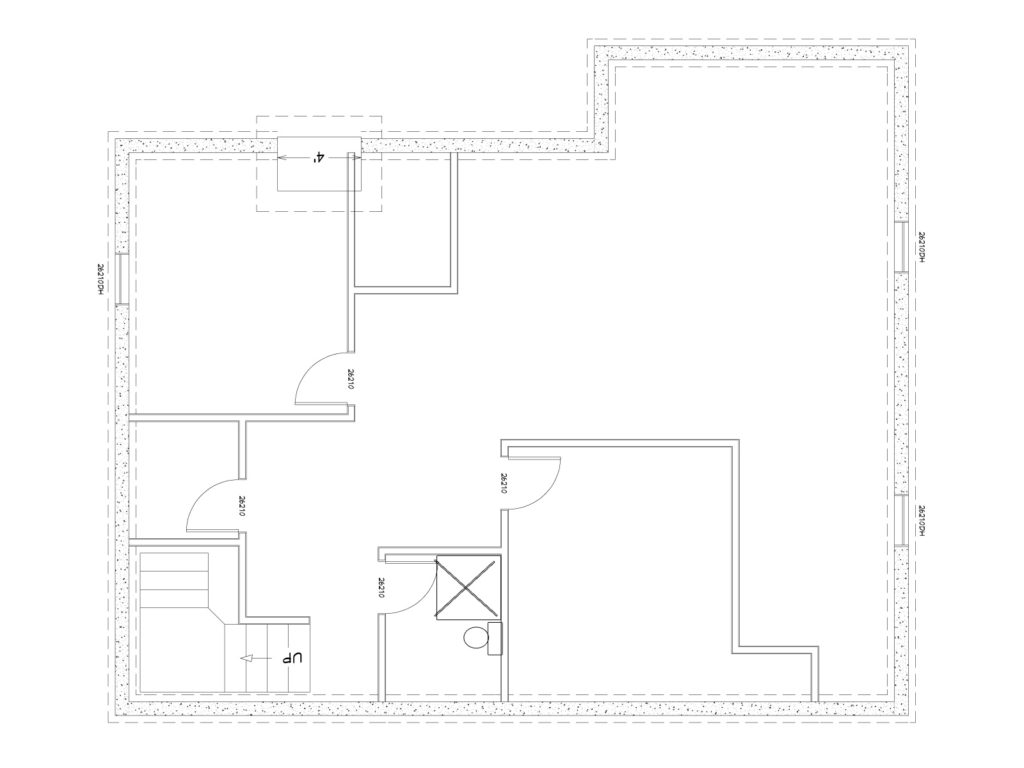
    Basement Plan
    • Keep the one bedroom were it was but add another bedroom beside it
    • Add an egress window to each bedroom to maximize light and make them safe
    • Move the location of the bathroom so we could create a common hall which gave both suites access to the utility room
    • Build a full galley kitchen in the back of the basement
    • Turn the large rumpus area into a living/dining room complete with fireplace

    It was an ambitious plan and it had to be done in stages starting with the basement suite first so it could generate the capital to renovate the main floor later. But through luck and the generosity of family we were able to do both renovations back to back. In hindsight we should have done the main floor first and then the basement, but we didn’t know we would have the money we needed to do the full job until the basement was already finished.

    With our stage one city permits in hand we started ripping down ceilings in the basement and demoing a closet upstairs. Click here for the next post to see how we maximized the upstairs bath and gave it a little hint of spa.

  • Renovation Check In

    Renovation Check In

    It’s been three months since my last blog post and we moved into our new house. I’ve been wanting to write a post for two months but have honestly not known where to start. The project is so large it’s hard to sum up in a few paragraphs, but I’ll try and be succinct.

    I mentioned in the Our First House post that we had specific requirements for our first house. Our idea was to purchase a house where the basement could be converted into Income Suite. My parents introduced me to the idea with their handful of income properties when I was a teenager. Scott McGillivray further sold me on the idea with his dreamy hair and “cheques to the bank” battle cry.

    But what fully convinced me to go down the investment property route, was the book Wealth Magnet, by Dr Dolf De Roos. In it he explains his buy and hold philosophy and turning your biggest debt into a positive that brings in monthly income as it appreciates. As great as being a creative entrepreneur is, I think it’s smart to diversify my streams of income and have something stable to count on when my art isn’t selling.

    So far we have demoed the basement; replaced and resized a window; added a walk in shower to the bathroom upstairs; and started about half the reframing in the basement. Still left to complete is EVERYTHING! Jobs have been started but nothing is fully fully complete yet and it’s starting to get a little overwhelming to say the least.

    Basement Demo | Tracey Cameron Creative

    We need to; demolish the basement bathroom; dig and trench the basement floor for the new bathroom location; finish framing the basement bathroom; insulate the ceiling with safe & sound; hang, mud, and tape drywall; insulate the cement floor; install vinyl plank flooring; install cabinets; … oh my this list is getting long and it’s not even complete.

    Our timeline is to have the basement finished and rented for June 1. Three more months? Can it be done? I have to keep reminding myself that little steps add up overtime so I don’t let the to do list feel insurmountable.

    Renovation Progress Upstairs Bath Sneak Peak | Tracey Cameron Creative

    One positive is the upstairs bath is almost complete. Just some waiting on faucets to arrive and to choose a paint colour. I will feel much better when the bathroom is done! It was a big difficult project to start with so it will feel like a major accomplishment to have it completed. Look out for my next post (it won’t be in three months I promise!) and I’ll sum up the upstairs bath project.

  • Our First House

    Our First House

    Two weeks ago, my boyfriend and I did something I’ve been dreaming about for a long time… We bought our first house!!!

    You may or may not know but I am a huge home fan. A little bit of a home body, but more of a interior decorating fanatic. I love to watch people smash down dark dated walls and build a beautiful bright airy space in its place. I’ve had my hand in a few interior projects, mainly my family’s Inn, The Prairie Creek Inn, but this is the first space that I can call my own. And I have to say I’ve been dreaming about our first house for a while.

    The actual purchase and transfer of our first house was a bit stressful for us. We have specific plans, that I will expand on in a later post, which required a bit of a different layout, so finding the right house proved to be a challenge. After two months, 60 viewings, a very patient realtor, and two failed offers, we finally found our home.

    I feel like this home was waiting for us.

    The seller, put off listing for months, and when he finally did list, I saw it online and knew we had to see it in person right away. It was in the neighbourhood we like, had great curb appeal and a willow tree (a wish list item of mine!). We weren’t the only ones that were excited about this house. They had so much interest in the first few hours that we had to share our viewing spot with four other couples, according to our Realtor, that is usually not done in the home selling game.

    After a rushed 20mins of walking through the house, and less decision time than it normally takes me to buy a sweater, we decided it was the one and put in an offer that evening. To my disappointment so did three others! It took 30 hours and a bit of back and forth, but late the next evening we heard the good news, the seller picked us!

    It took 40 days to close escrow. I’m glad it wasn’t three months because I might have gone nuts with anticipation! But during those 40 days I was distracted by the piles and piles of paperwork required. I’ve discovered that working with a bank to get a mortgage is a little like standing naked in a cold room as people point out all your flaws. I felt like such a dirt bag. Being a self employed creative has not had me rolling in the green, YET, and they made me feel like such a loser for it. My issues I know, a future blog post I’m thinking, but thankfully my boyfriend has a steady job and his strengths balanced out my weakness and vice versa.

    Moving day finally did come.

    I was so excited I had most of our house packed up the week prior, but I can’t say the same for the seller. I don’t know the particulars but it really didn’t seem like he was as excited to move as we were and that was clearly evident when we did our final walk through. 12 hours until he was suppose to hand over the keys to us for good and he didn’t have one packed box in the house. All we saw were his possessions in piles on the floor everywhere! We took it in stride and hopped he was a night owl who would put on his superman cape and miraculously get his house all packed up.

    Turns out no cape

    He is a mere underprepared mortal who was still packing and moving his stuff out when we arrived with our full moving van the next day. We actually had to help him. An hour after we had legal possession, we were packing and moving boxes for this guy. Three hours after having legal possession he finally had moved all his stuff to the lawn where he proceeded to shove it in a rented van. Turns out though he forgot a few things, like the contents of the entire garage, eight bags of garbage in the backyard, bottles in the fridge and to clean the kitchen or bathrooms!

    Needless to say it wasn’t the best first house buying moving day and it actually made our Realtor very mad. With his encouragement we contacted the lawyers and the seller agreed to give us some financial compensation for the state of the home. It didn’t bring back a nice happy moving day into our first home, but it did cushion the blow a little, and a least we have quite the story to tell!

    So we have been in our first house for just over two weeks now.

    The demolition has already started and our plans for the next step are solidifying. In the next post I”ll show where we started and explain where we hope to end up. I know this is a side tangent from my art focused blogging but this is a big chunk of what makes me me. I hope you’ll join me as we transform this little 60’s bungalow into our first step down the real estate investing rabbit hole.

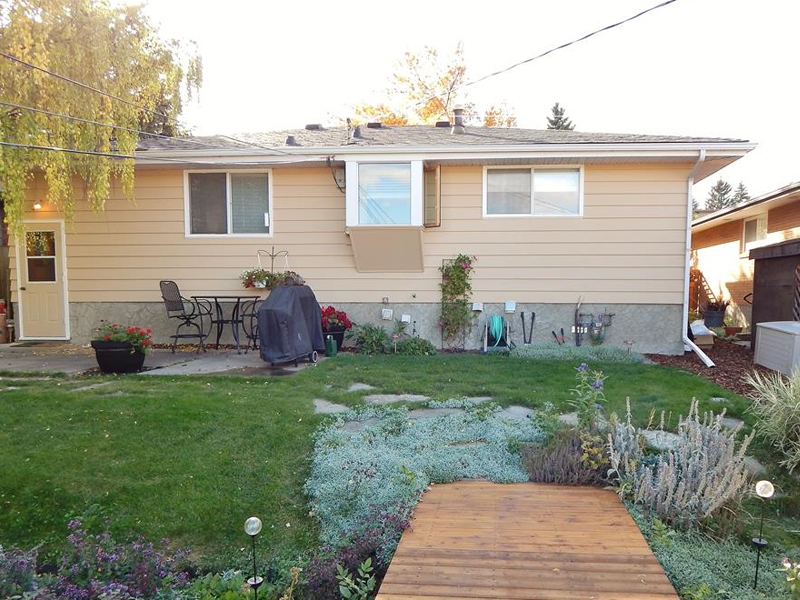
    Our new homes back

  • My Inner Moma Bear

    My Inner Moma Bear

    I dreamt last night about becoming a mama bear … twice!

    The first dream consisted of a sleepover with a bunch of girlfriends and a lost kitten. It was clear this kitten needed to be taken care of and after listening to a cell phone message, I agreed to take in the kitten. In the second dream I was traveling with my family and had a newborn baby boy that I was insistent, had to be strapped to me at all times.

    Dreams like this are not normal for me, not only because I don’t usually remember any of my dreams. But also because they don’t usually connect so clearly to what is going on in my current life. No I’m not expecting! but I have been reading Christiane Northrup’s book Mother Daughter Wisdom. It’s giving me a lot of insights into my own relationship with my mother, but also the kind of mother I want to some day be.

    Now I won’t say that the book isn’t a daunting read, it is 625 pages long! And most people now have a hard time staying present while reading a paragraph (you’re probably doing something else while reading this blog post, or have gotten bored already and stopped reading). But it is a worthwhile investment in knowledge of the most important relationship we have during our lifetime. I’ve learned that my love of food stems from lovingly given baby formula and my deep feeling of ‘not enoughness’ stems from my first connection in the world. But the things is, it’s not just our mothers, it’s their mothers and their mothers and so on back into the stone age. Woman pass on the linage we’ve been taught and I believe it is up to us to reinforce the healthy messages and stop the negative ones. We are not all going to learn to be super human mothers, that is just a fairy tale. But I truly hope we can try to foster a generation of children/woman that are a little closer to knowing their power and worth on a cellular level.

  • How to Hang Textile Art

    How to Hang Textile Art

    Now that we’ve gone over the basics of how to care for textile art, let’s talk about how to hang textile art. We all had that friend in college who hung up a piece of fabric on the wall with push pins, we are going to be a little more polished than that.

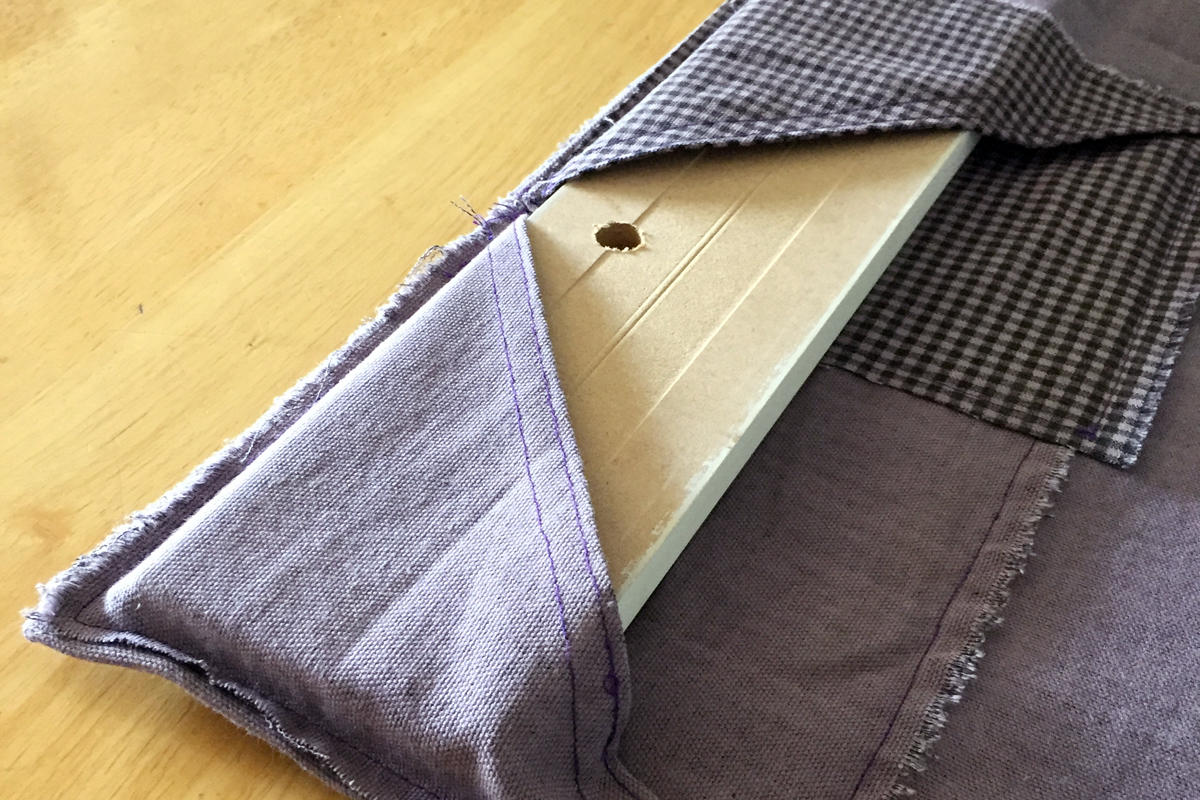
    There are two methods I choose to use when hanging textile art. For large scale pieces (ie greater than wide 20”) I used a hanging rod that is inserted into a hanging sleeve that I have sewn near the top edge of all my pieces. The rod consists of a piece of painted MDF baseboard with two to three small holes drilled through that can be then hung on the wall. I choose to use painted MDF instead of bare wood as the wood will leach acids into the fabric, that over time will either discolour or harm the structure of the fibres. Whereas the painted MDF will not.

    Hanging Rod | How to hang large scale pieces of textile art | Tracey Cameron Creative

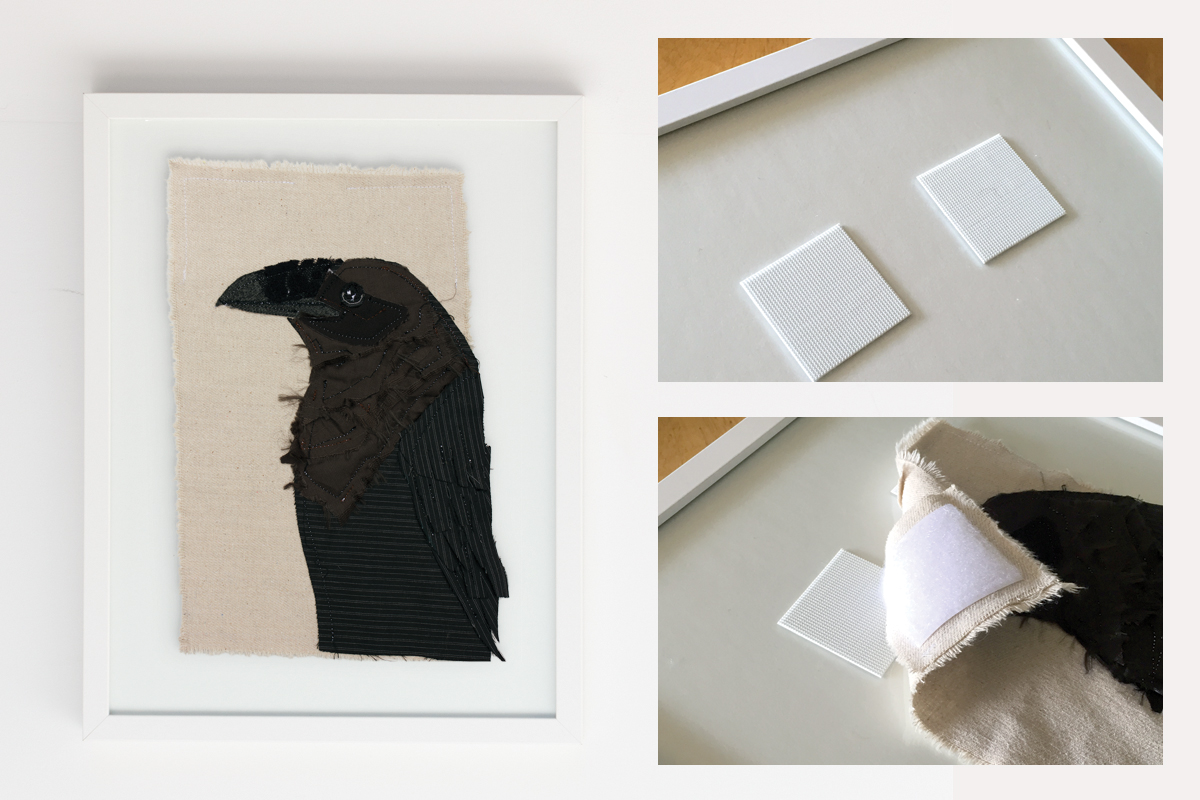
    Flock of Ostrichs | Textile Art | Tracey Cameron CreativeFor small and medium scale pieces (ie smaller than 20” wide) I prefer to hang them framed, as it gives them a bit more visual presence and weight in a room. To hang I have sewn 2-3 velcro tabs near the top edge of the textile art which can be paired with adhesive backed velcro pieces mounted on matt board which is then inserted into a frame. I choose to leave the glass off the frame as I mentioned in the How to Care for Textile Art post, fibres need to breath and enclosing them in glass can cause premature aging.
    How to Frame Small Scale Textile Art | Tracey Cameron Creative

    Because of it’s world wide accessibility, I choose to size my pieces to fit within RIBBA frames from Ikea. If you are having your piece custom framed you can choose to include glass but have your framer insert some small vent holes in the side so your textile art can breath.

    If you like the look of textile art hanging “naked” on the wall regardless of size, the velcro tabs also double as a hanging sleeve and can be hung in the same manner as the large scale pieces.

  • How to Care for Textile Art

    How to Care for Textile Art

    Textile art can be a little tricky. Although this medium has been around for thousands of years people aren’t always familiar with textile art and what are the best ways to care for it. Whether the piece is a wall hanging, an art pillow or a soft sculpture there are some basic rules you should follow when displaying your textile art.
    • Keep it out of direct sunlight and fluorescent lighting. Like most pieces of art, sunlight is a harsh mistress. The power of those UV rays can be quite harmful to textiles. At best it will cause discolouration and fading and at worst it will dry out and speed up the decomposition process of the fibres.
    • Ensure proper air circulation. Unlike paper or canvas, textiles need to breath. Keep your fibre hangings happy by leaving the glass off when framing or include vents in the sides. For sculptures, a enclosed glass case helps keep the work safe from water, hands and dust but does need vents to encourage air flow.
    • Keep away from heat sources, like fireplaces and radiators, and display at normal room temperature, 18-23C, in an area without high humidity. Meaning find another piece of art for the bathroom!
    • Avoid contact with liquids. If someone got a little trippy at your last dinner party and If the piece must be cleaned, spot clean with water, and if necessary, a diluted mild detergent.

    If you follow the basic rules of care your textile art piece will be a treasured heirloom you can pass down through generations.

    Check out my follow up post on How to Hang your Textile Art to get my tips on how best to display your piece.

  • Making of Seagull

    [cs_content][cs_section parallax=”false” style=”margin: 0px;padding: 45px 0px 0px;”][cs_row inner_container=”false” marginless_columns=”true” class=”cs-hide-lg” style=”margin: 0px auto;padding: 0px;”][cs_column fade=”false” fade_animation=”in” fade_animation_offset=”45px” fade_duration=”750″ type=”1/1″ style=”padding: 0px;”][cs_text]I decided to do a little time-lapse video of what goes into the making of one of my pieces of textile art. This piece is called Seagull (very insightful I know) and was inspired by a night a few weeks ago on my back deck. I was lounging enjoying the lingering evening heat and this flock of seagulls spent an hour or more circling, flying and playing overhead. It was beautiful to watch them catch the evening sun on their wings and bodies drifting in and out of sun & shadow.[/cs_text][/cs_column][/cs_row][/cs_section][/cs_content]
  • Bibliophiles Unite

    Today, Aug 9th, is National Book Lovers Day. There seems to be a day for everything but this is one I can get behind. A good book and a sunny window bench has been my idea of heaven ever since I was a young girl. Books have the ability to entertain, transport you to far away lands, open your perspective and teach you how others think and feel. I don’t think I would be the same person today if I hadn’t learned to love reading.

    “Never trust anyone who has not brought a book with them.”
    — Lemony Snicket

    So you have mine and full national permission to blow off work and crack open a good read!